How to Deploy a V2 Frame on Orbiter
Building on Farcaster—an open social media alternative to platforms like X—is something we at Orbiter are very familiar with, and to this day it’s a blast to build with. One of the more recent and exciting developments is V2 Frames. If you happened to be around almost a year ago the original Frame spec was launched and opened up some really interesting possibilities, but it also had some limitations. Back then Frames were just an open graph image with buttons that sent post requests to a server where your Frame lived. Now with V2 Frames are full blown web apps that can access the Farcaster social graph, prompt crypto wallet transactions, and more. What’s even better is with this iteration of Frames is they can be hosted as static web apps, further simplifying the process for developers that want to build them! In this tutorial we’ll show you how to launch a V2 Frame on Orbiter, which is fitting since Orbiter is also built on sufficiently decentralized technology.
Setup
Before we get started there are a few things you’ll need:
- A Farcaster account - Visit farcaster.xyz and download the Warpcast app and follow the sign up flow. Follow us (Justin & Steve) while you’re at it ;)
- Node.js (v.20 or higher) - I personally really like using fnm to manage Node versions
- A text editor like VSCode, Cursor, or Zed
- An account on Orbiter - Login with either Google or Github in just a few seconds!
With the Frames V2 spec you can really build with any Javascript/Typescript framework, so for this tutorial we’ll keep it simple and use React. Start up a new React project with Vite using the command below:
npm create vite@latest myframeWhen it gives you some options go ahead and select React and you can use either Javascript or Typescript, but we’ll use Typescript for this tutorial. Once selected we’ll follow the prompt and run these commands:
cd myframe
npm install
npm run devThis should spin up our dev server with the Vite + React boilerplate counter!
Go ahead and stop the server and then run npm run build. This will generate a dist folder that we’ll go ahead and upload to Orbiter to deploy our site. You can do this by logging in to app.orbiter.host, clicking new site in the top right, select or drop the dist folder, and give it a domain name!
// Video
Another option is using the Orbiter CLI, which in my opinion is just as easy:
# Install the CLI
npm i -g orbiter-cli
# Use google or github as the provider to login
orbiter login -p google
# Create the site
orbiter create -d myframe ./distOnce the site is deployed you should get a website link like https://myframe.orbiter.website. Keep this link handy as we’ll use it later.
Building the Frame
In order to build the frame we’re going to need three things:
- Frame SDK
- Frame Manifest
- Frame Embed Meta Tag
Let’s go over each of these step by step.
Frame SDK
The Frame SDK is what will allow us to access user information and prompt the user with different actions. First thing we need to do is install it, so in the terminal run this command:
npm i @farcaster/frame-sdkOnce installed open the main App.tsx file and let’s put in the following code:
import { useState, useEffect, useCallback } from 'react'
import './App.css'
import sdk from '@farcaster/frame-sdk';
import { Context } from '@farcaster/frame-sdk';
function App() {
const [isSDKLoaded, setIsSDKLoaded] = useState(false);
const [context, setContext] = useState<Context.FrameContext>();
const [isContextOpen, setIsContextOpen] = useState(false);
useEffect(() => {
const load = async () => {
setContext(await sdk.context);
sdk.actions.ready();
};
if (sdk && !isSDKLoaded) {
setIsSDKLoaded(true);
load();
}
}, [isSDKLoaded]);
const toggleContext = useCallback(() => {
setIsContextOpen((prev) => !prev);
}, []);
if (!isSDKLoaded) {
return <div>Loading...</div>;
}
return (
<div style={{
maxWidth: "400px",
margin: "0 auto",
padding: "0 16px"
}}>
<h1>Frames v2 Demo</h1>
<div>
<h2>Context</h2>
<button
onClick={toggleContext}
>
<span>
➤
</span>
Tap to expand
</button>
{isContextOpen && (
<div style={{
overflow: 'auto',
maxWidth: '100%'
}}>
<pre style={{
whiteSpace: 'pre-wrap',
wordWrap: 'break-word',
wordBreak: 'break-word',
overlowWrap: 'break-word',
maxWidth: '100%',
fontSize: '14px'
}}>
{JSON.stringify(context, null, 2)}
</pre>
</div>
)}
</div>
</div>
)
}
export default AppThe key things to note here that we’re implementing useEffect to load our SDK context and set a state when it’s ready. If it’s not ready we don’t render the main frame content just yet. Once it is loaded then we can set the context state and toggle to see it; this is going to contain all the important info like who is viewing the frame. If you go ahead and run npm run dev You’ll see the screen with the context button, but if you click on it you won’t see anything. This is because our local host environment isn’t being run in a Farcaster host, so if you really want to preview it you’ll need to use a tool like Ngrok or Tailscale to tunnel your local port 5173. You are welcome to give this a shot as well, but we’ll also be able to test this in production soon!
Frame Manifest
Part of what helps Farcaster know if a link is a Frame or not is the Frame Manifest. This is a JSON object that has details like the name of the frame, a link to the cover image, what the button should say, etc. Since our site is static we can simply place this info in the right spot in our public folder for Farcaster to find. Create a new folder in public called .well-known and inside that folder make a new file called farcaster.json. To generate the JSON for our app we’ll need to use the Warpcast app. Open it up on your phone and navigate to Settings > Developer > Domains.

Here you’ll want to put in the domain of your site that we’ve already deployed, e.g. myframe.orbiter.website. Once you put this in click “Generate domain manifest” and copy it into the farcaster.json file. It should look something like this:
{
"accountAssociation": {
"header": "eyJmaWQiOjYwMjMsInR5cGUiOiJjdXN0b2R5Iiwia2V5IjoiMHg0NTYxMzExNjFmODNDN0Q3ZkRBMTViMzJhNWY3QzIxRkQ0RTI3RTk2In0",
"payload": "eyJkb21haW4iOiJteWZyYW1lLm9yYml0ZXIud2Vic2l0ZSJ9",
"signature": "MHhhYjVmYjE1YmZmY2U2YmJkOTlmNWJmOWJmNmU1NDk3ZWY1ZGI1NjJhZGIyZTg5MjU4Y2E4ODAxODcyMWI1ODk2NTUyYzU0MjY0ZDdkMzhiMjJlZTI1YWYyOGRlOThiYmMyNDkzN2E3ZWNkZmJlYmZiZjJmMzliYWJlMmEwZDJmOTFi"
},
"frame": {
"version": "1",
"name": "Example Frame",
"iconUrl": "https://myframe.orbiter.website/icon.png",
"homeUrl": "https://myframe.orbiter.website",
"imageUrl": "https://myframe.orbiter.website/image.png",
"buttonTitle": "Check this out",
"splashImageUrl": "https://myframe.orbiter.website/splash.png",
"splashBackgroundColor": "#eeccff",
"webhookUrl": "https://myframe.orbiter.website/api/webhook"
}
}There’s a few things to note here, starting with the accountAssociation. This is a signature from your Farcaster account that will be associated with your Frame so the person interacting with it can verify who built it, so copying and pasting from this tutorial will not work. You must generate it from your own account in Warpcast! In the frame object we have some of the basic information like the name, buttonTitle, and images. The images such as iconUrl, imageUrl, and splashImageUrl are all mandatory so you will need to have images for these. If you want some placeholders you can click here to download some template images. They’e all name according to what you see here so all you have to do is unzip the folder and drop the images into your public directory! Since we’re not going to use the webhookUrl I would recommend removing that line, and adjust the splashBackgroundColor to just plain white #ffffff. So in the end we have this in our farcaster.json:
{
"accountAssociation": {
"header": "eyJmaWQiOjYwMjMsInR5cGUiOiJjdXN0b2R5Iiwia2V5IjoiMHg0NTYxMzExNjFmODNDN0Q3ZkRBMTViMzJhNWY3QzIxRkQ0RTI3RTk2In0",
"payload": "eyJkb21haW4iOiJteWZyYW1lLm9yYml0ZXIud2Vic2l0ZSJ9",
"signature": "MHhhYjVmYjE1YmZmY2U2YmJkOTlmNWJmOWJmNmU1NDk3ZWY1ZGI1NjJhZGIyZTg5MjU4Y2E4ODAxODcyMWI1ODk2NTUyYzU0MjY0ZDdkMzhiMjJlZTI1YWYyOGRlOThiYmMyNDkzN2E3ZWNkZmJlYmZiZjJmMzliYWJlMmEwZDJmOTFi"
},
"frame": {
"version": "1",
"name": "Orbiter Demo Frame",
"iconUrl": "https://myframe.orbiter.website/icon.png",
"homeUrl": "https://myframe.orbiter.website",
"imageUrl": "https://myframe.orbiter.website/image.png",
"buttonTitle": "Demo",
"splashImageUrl": "https://myframe.orbiter.website/splash.png",
"splashBackgroundColor": "#FFFFFF"
}
}Frame Embed Meta Tag
The last thing we need in order for our frame to work is the Frame embed meta tag. This is similar to the meta tags you would use for open graph previews on socials, except this one also helps signal to Farcaster that this link contains a frame. Here’s the basic template:
<meta name="fc:frame" content="<stringified FrameEmbed JSON>" />What goes inside the content piece is pretty similar to our Frame Manifest. Make a new file called metadata.js in the root of your project and put in the following:
console.log(JSON.stringify(
{
version: 'next',
imageUrl: 'https://myframe.orbiter.website/image.png',
button: {
title: 'Launch',
action: {
type: 'launch_frame',
name: 'Launch',
url: 'https://myframe.orbiter.website',
splashImageUrl: 'https://myframe.orbiter.website/splash.png',
splashBackgroundColor: '#ffffff'
}
}
}
))Be sure to update the info inside with your own domain, and then execute the file to get the stringified JSON:
node metadata.jsCopy the result from your terminal, and then inside the root index.html file add the meta tag with the json inside of it:
<!doctype html>
<html lang="en">
<head>
<meta charset="UTF-8" />
<link rel="icon" type="image/svg+xml" href="/vite.svg" />
<meta name="viewport" content="width=device-width, initial-scale=1.0" />
<meta name="fc:frame" content='{"version":"next","imageUrl":"https://myframe.orbiter.website/image.png","button":{"title":"Launch","action":{"type":"launch_frame","name":"Launch","url":"https://myframe.orbiter.website","splashImageUrl":"https://myframe.orbiter.website/splash.png","splashBackgroundColor":"#ffffff"}}}'/>
<title>Vite + React + TS</title>
</head>
<body>
<div id="root"></div>
<script type="module" src="/src/main.tsx"></script>
</body>
</html>With that we’ve completed the steps for our frame to take out!
Updating and Testing
Since we’ve already created our site on Orbiter all we need to do is update it with the changes we’ve made and test it on Farcaster. To start you’ll want to run npm run build to make a new dist folder. From there you can go to the Orbiter App and update it there by clicking on the settings cog for your site, then clicking “Update.”
Alternatively if you’re using the CLI you can run this command with your own subdomain in place of myframe:
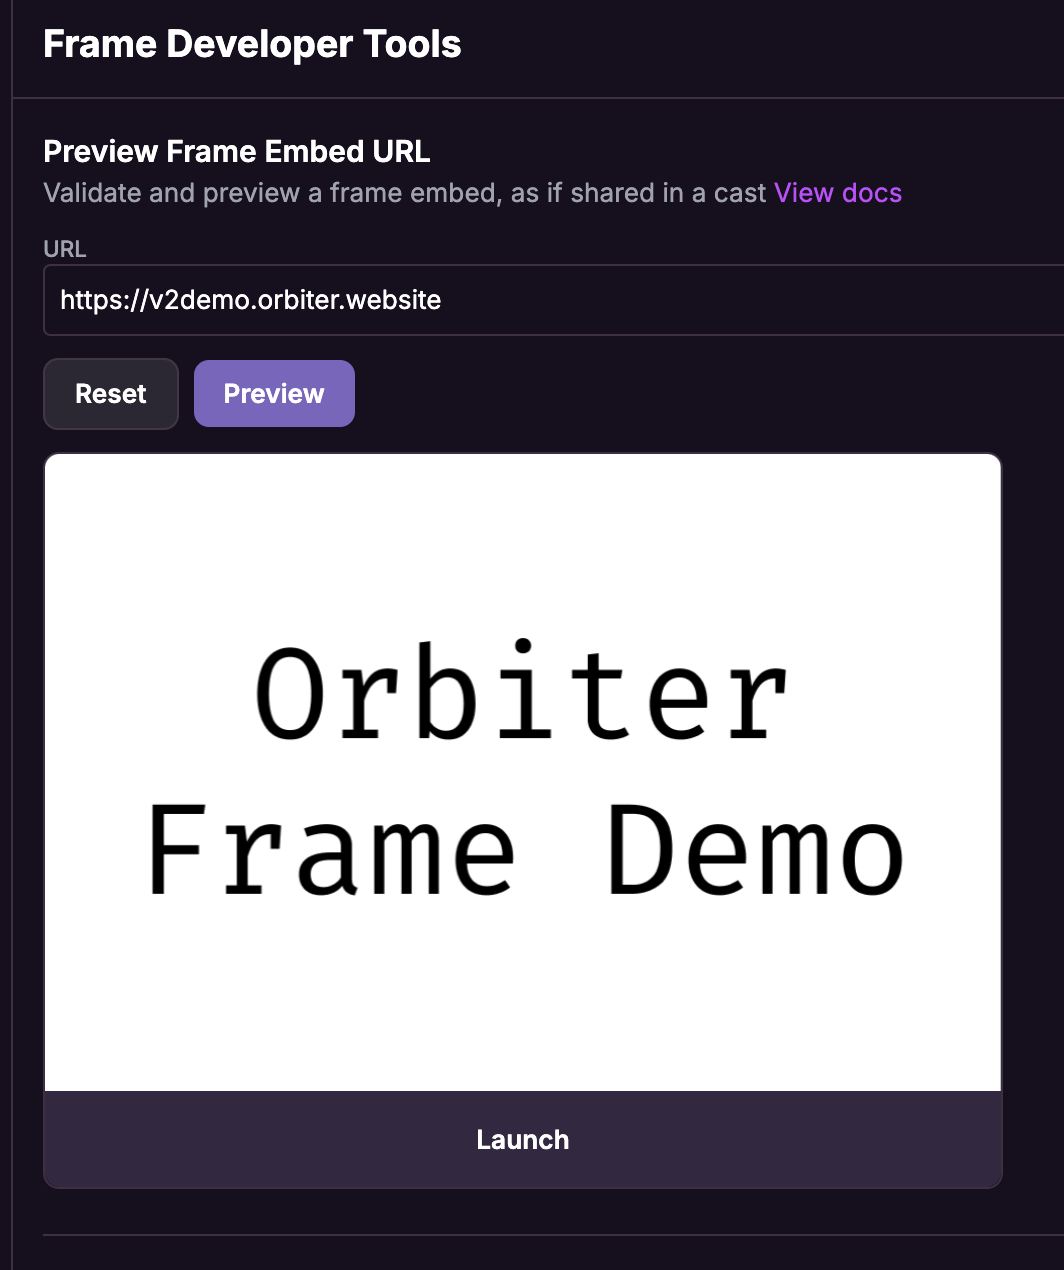
orbiter update -d myframe ./distAfter the site is finished updating you can make your way to the Frame Developer Tools and paste your site URL into the embed preview. This will make sure that your Frame Manifest and Frame Embed tag are working properly. Once it shows up you can also test launching the frame by clicking the Launch button!
Now on your journey you are likely going to encounter some weird edge cases because Frames are still on the edge. The pieces moving to develop these are moving quickly, so here are some tips to diagnose any issues you might have:
- Use the Domain tool we used to generate the Frame Manifest to also validate your frame. Sometimes it can provide help debugging info, like an invalid color or a missing field.
- If the Frame Embed won’t show, this could be due to an invalid Frame Manifest or an invalid Embed Meta Tag, so be sure to check the manifest first, then make sure the information is valid in the embed tag.
- Logging the Frame context like we did with our toggle button is a good way to make sure the injected Farcaster info is coming through
- Reach out on the /frames-v2 channel for help if you get stuck!
Wrapping Up
This really just scratches the surface of what you can do with a V2 Frame, as they’re built to handle sign in with Farcaster, wallet transactions, and more! Be sure to check out framesv2.com where the resources continue to grow, and the repo for this frame on our GitHub. We’re excited to see what people can build and how it can be hosted on IPFS and Base through Orbiter!
Signup for our Newsletter