How To Create a Static Site Blog With a Headless CMS

I'm currently writing this blog post in a headless CMS. This is the first post on our site written that way. Up until now, Steve and I have written posts in our code editor, or in my case, I've written in Obsidian. Obsidian is great, but it's single player and less accessible than web apps. That's where a headless CMS shines.
But what is a headless CMS?
Headless CMS
A CMS is a content management system. It does what it says on the tin. It manages content. WordPress, for example, is a CMS. WordPress is designed to be a CMS for your entire site where you never need to touch the code (unless you want to). It's also a server-side platform. A headless CMS on the other hand does not necessarily mean your entire site is run server-side. This is where the "headless" part of the name comes into play.
A headless CMS does not care what your site looks like or where it is hosted. Instead, it creates an application programming interface (API) that allows your site to communicate with the content the headless CMS manages. There are many flavors of this, but these types of CMS tools fall into two broad categories:
-
Your site fetches content (either at build time or live) from the headless CMS and converts that content into pages on your site
-
The CMS creates new files for your site to use but your site never needs to make a remote API request
The headless CMS we'll be using falls into the second category. We'll be using Pages CMS, an open source headless CMS that connects directly to your Github repo. Pages CMS allows you to define a simple configuration file to make sure it knows where your media assets are and where your content is. As you create new content, you will be writing commits back to the Github repository where your site lives.
Getting Started
We're going to create a static site using Eleventy, but you can use whatever generator you'd like. The results will be similar but the set-up will be different. To get started, you'll need to fire up your terminal app.
First, create a new directory for your site and change into it:
mkdir my-static-site && cd my-static-siteNow, you'll need to initialize your project to use npm. Run the following:
npm init -yWhen that is complete, you can install Eleventy with this command:
npm install @11ty/eleventyOk, now we're ready to set up a very simple site and then demonstrate how Pages CMS will make creating blog post entries dead-simple. Let's add an index.html file in the root of our project. You can do this via the terminal or open the project in your favorite code editor. I'll be using VS Code. Inside that file, add the following:
---
layout: layout.html
---
<h1>Welcome to my homepage!</h1>You might be looking at that and thinking, "that's not right." It's not right if you're using something other than Eleventy, so be sure to follow the guide of whatever static site generator you're using. For Eleventy, this is how you wrap a file in a universal, reusable layout. So our home page and our blog posts will both use this layout.
Let's create that layout file now. Add a directory to your project called _includes. Inside that directory, add a file called layout.html. Inside that file, add:
<!DOCTYPE html>
<html lang="en">
<head>
<meta charset="UTF-8">
<meta name="viewport" content="width=device-width, initial-scale=1.0">
<meta http-equiv="X-UA-Compatible" content="ie=edge">
<title>11ty Site!</title>
</head>
<body>
<nav><a href="/">My Static Site</a></nav>
{{ content }}
</body>
</html>This file can look however you'd like but remember it's the wrapper for your other content. In fact, you can see exactly where your other content will go. It'll be injected into the {{ content }} section.
Let's add a script to run our site and see it in the browser. In your package.json file, add this to the scripts section:
"scripts": {
"dev": "npx @11ty/eleventy --serve"
},Now, from your terminal, run:
npm run devYou should see that Eleventy automatically builds your index.html file and that it's available at https://localhost:8080. If you visit that in your browser, you should see your basic site.
Now, let's add some blog posts! Create a folder in your project called posts. Inside that folder, create a file called post1.md. Inside that file, add:
---
title: My First Post
description: A simple example blog post
layout: layout.html
tags: ["post"]
---
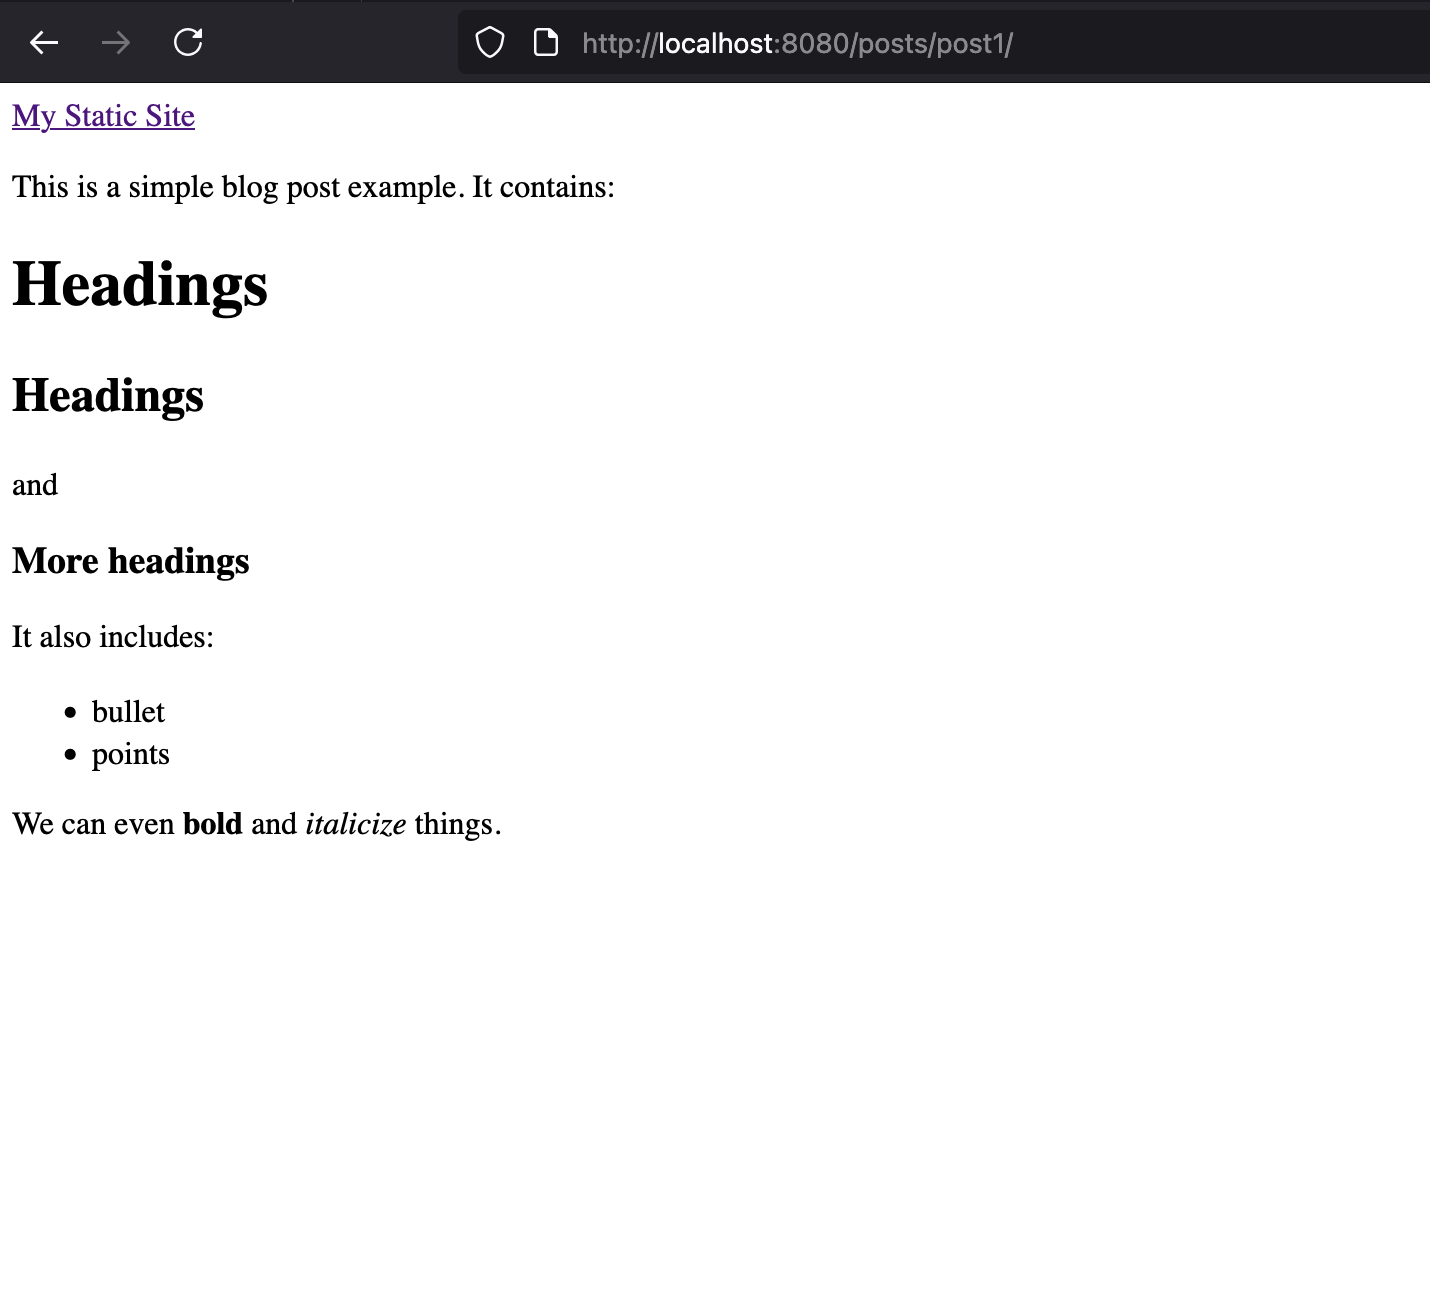
This is a simple blog post example. It contains:
# Headings
## Headings
and
### More headings
It also includes:
* bullet
* points
We can even **bold** and _italicize_ things.You can write whatever you'd like in this blog post. You can also change the top section—called frontmatter. The frontmatter is what's used to render details about the post. In this case, there are a couple of Eleventy specific fields (layout and tags), but it also includes the title and description. You can include anything you want, including author name, tags, and date. The layout field tells Eleventy to use the layout.html file we created earlier. And the tags field tells Eleventy to create a collection of files with the name of post. We'll use this collection in a moment.
Ok, so we have a post. If you look at your terminal, you'll see when you saved this file, Eleventy built it and included it in your site. If you go to http://localhost:8080/posts/post1 you'll see the blog post. This is great! But we still want to render the collection of posts on the home page.
Open the root index.html file, and let's update it to look like this:
---
layout: layout.html
---
<h1>Welcome to my homepage!</h1>
<p>Here are some blog posts</p>
{% for post in collections.post %}
<div>
<a href="{{ post.url }}">{{ post.data.title }}</a>
<p>{{ post.data.description }}</p>
</div>
{% endfor %}The special syntax here to loop over the post collection is courtesy of Eleventy and is possible because we tagged our post with the post tag.
Now, if you go back to your browser and open http://localhost:8080 you should see your blog post listed on the home page. Click it, and you'll see the simple navbar (with the link back to the home page) is still there, but your blog post content is rendered at the correct URL.
You now have a static site generated blog set up! You can create as many posts as you want, but what if you want an easier way to compose those posts? And what if you want to invite others who might not be so comfortable with the code editor and terminal? That's where a headless CMS like Pages CMS comes in.
Setting Up Pages CMS
Pages CMS is a free and open source CMS that builds on top of your existing Github repositories. So, the first step is to make sure you have a Github account. If you don't, you can sign up here for free. Next, you need to take your existing static site that we just created and "push" it to Github.
From your Github profile page, you should see a New Repository button. If not, click the Repositories link, then create a new one from there. Give your repository a name that represents your static site and decide if you want it public or private. When you've done this, you'll see a page like this:

To initialize a local git repository and then push to Github from the terminal, you'll want to follow this guide. When you've done this, you're ready to sign up for Pages CMS and connect your repository.
This video is a great tutorial on setting up pages, but I'll also walk you through it here. When you visit Pages CMS, you can sign up and will be asked to connect your Github account. When you do this, you will then be asked to allow Pages CMS access to your Github repositories. You can choose which repository or repositories to allow access to. In my case, I just selected the repository for my static site.
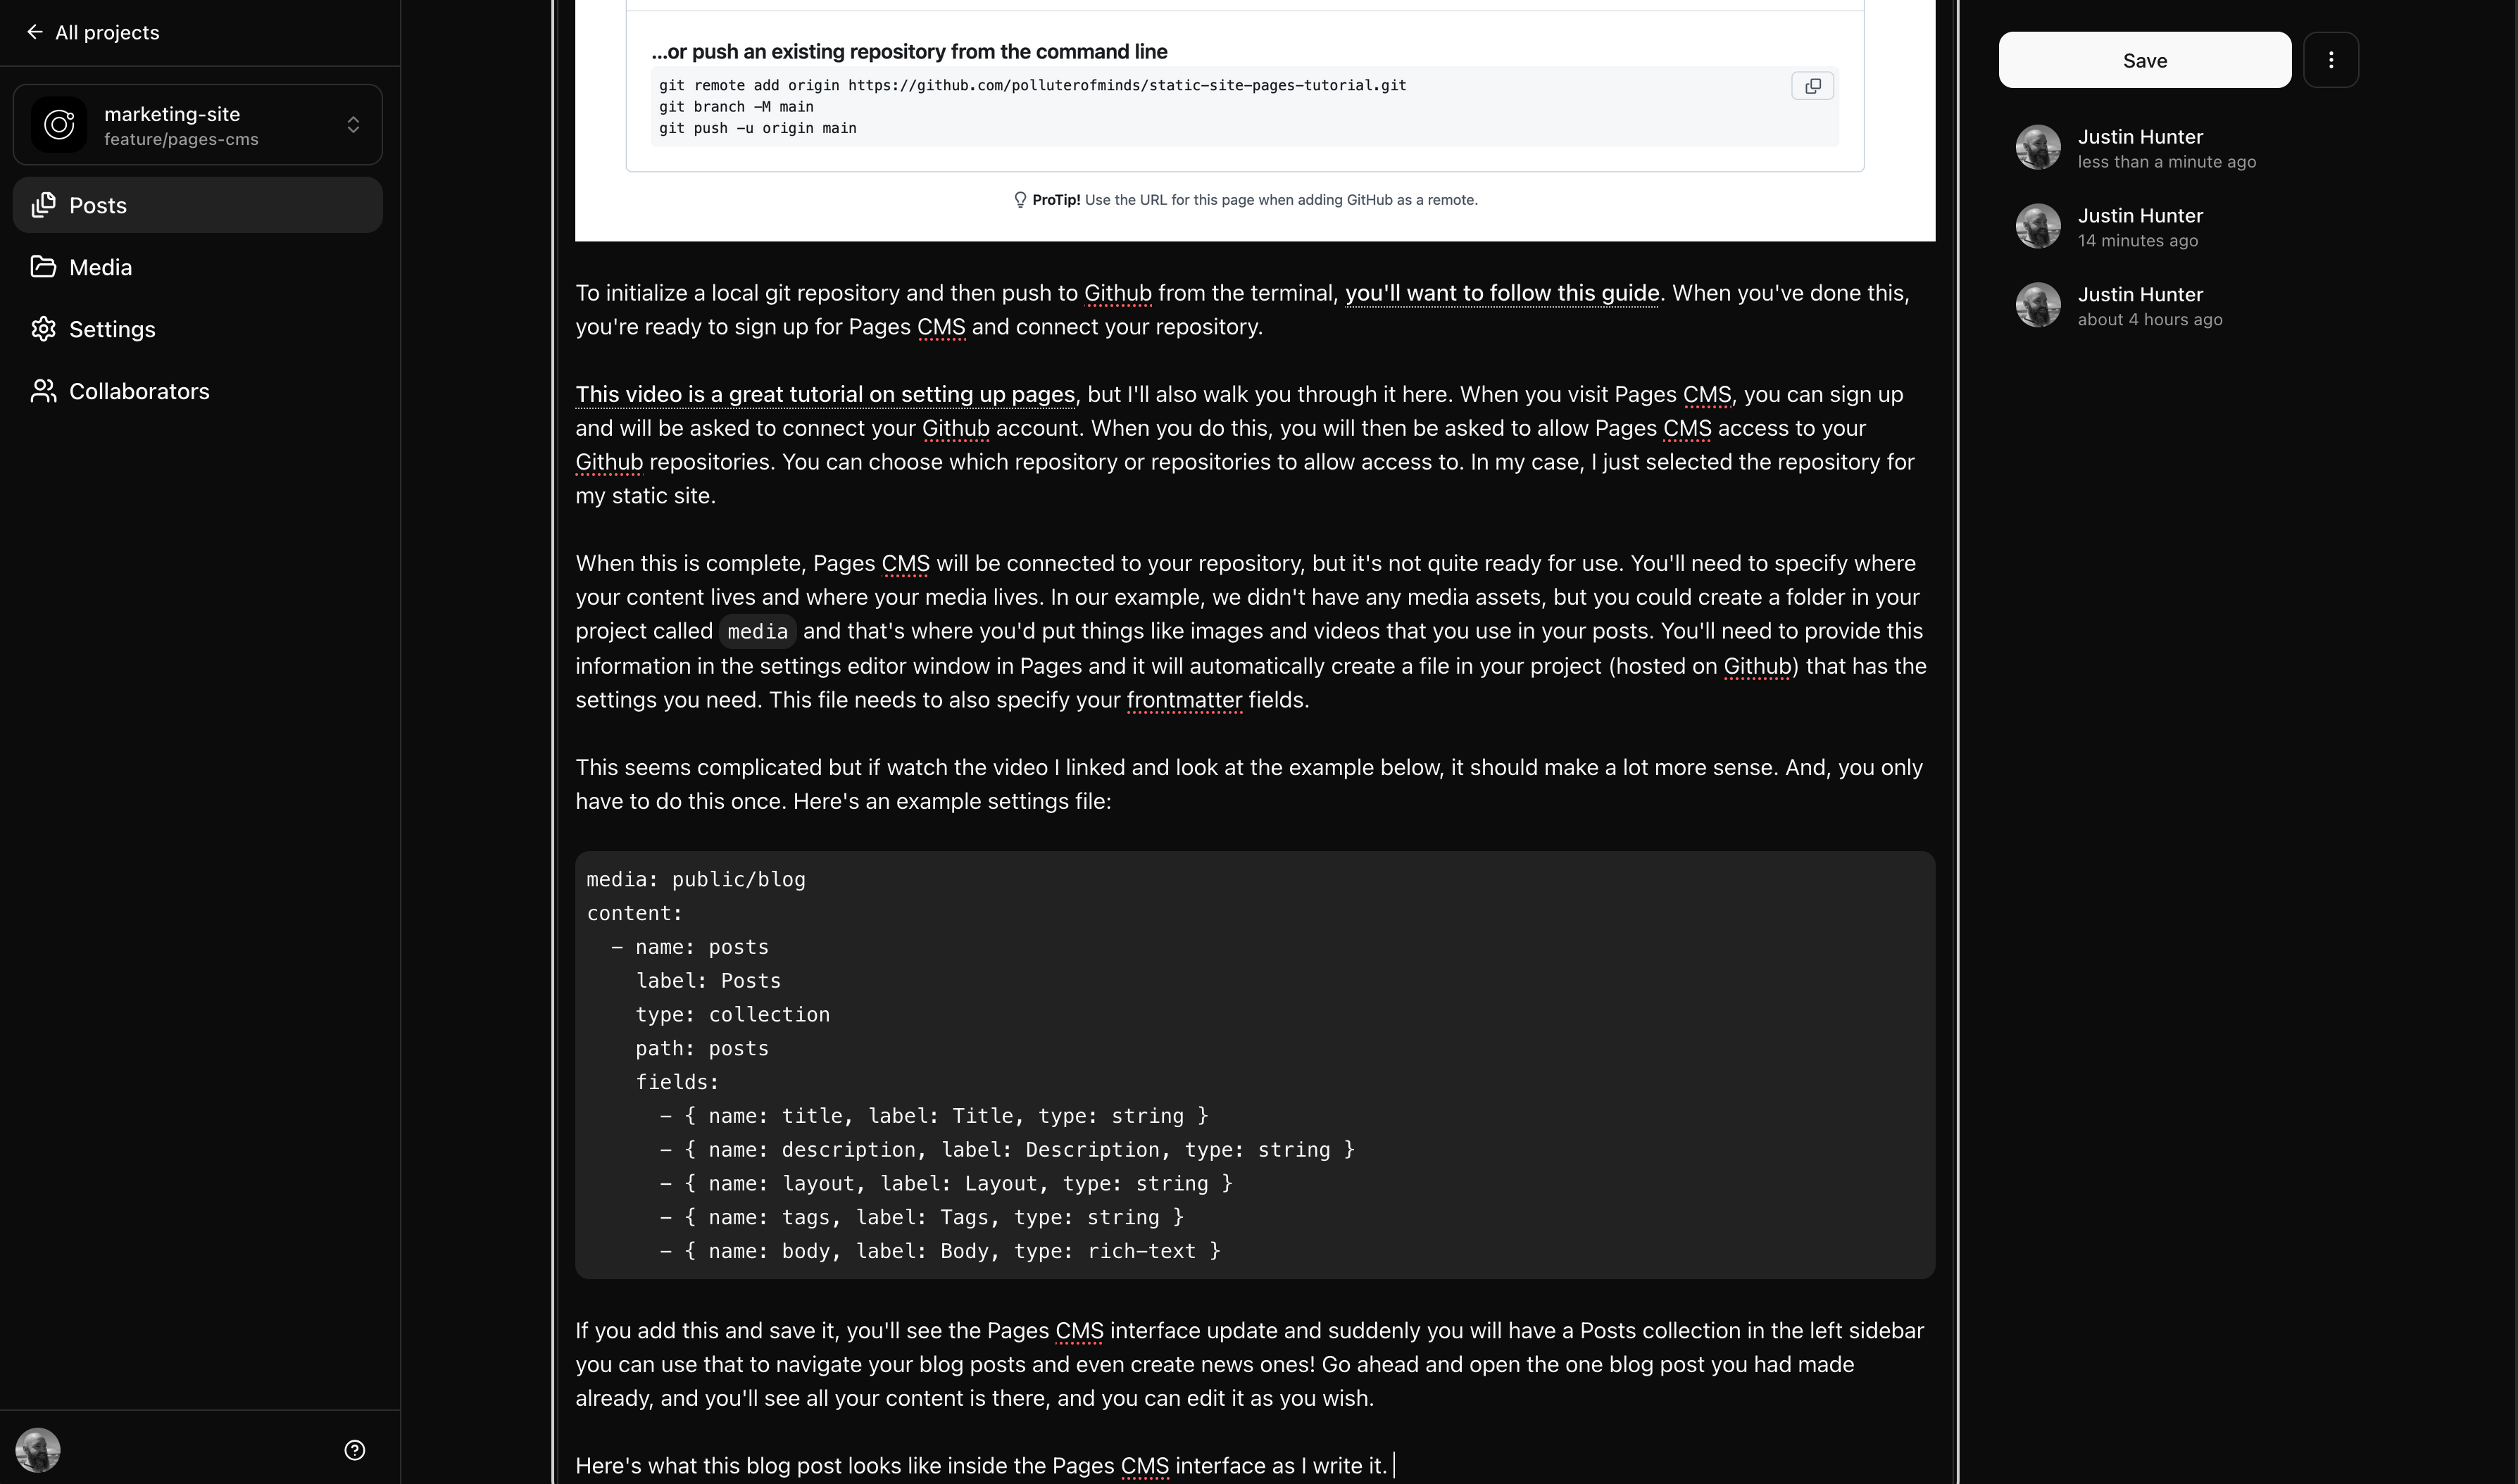
When this is complete, Pages CMS will be connected to your repository, but it's not quite ready for use. You'll need to specify where your content lives and where your media lives. In our example, we didn't have any media assets, but you could create a folder in your project called media and that's where you'd put things like images and videos that you use in your posts. You'll need to provide this information in the settings editor window in Pages and it will automatically create a file in your project (hosted on Github) that has the settings you need. This file needs to also specify your frontmatter fields.
This seems complicated but if watch the video I linked and look at the example below, it should make a lot more sense. And, you only have to do this once. Here's an example .pages.yaml settings file:
media: public/blog
content:
- name: posts
label: Posts
type: collection
path: posts
fields:
- { name: title, label: Title, type: string }
- { name: description, label: Description, type: string }
- { name: layout, label: Layout, type: string }
- { name: tags, label: Tags, type: string }
- { name: body, label: Body, type: rich-text }If you add this and save it, you'll see the Pages CMS interface update and suddenly you will have a Posts collection in the left sidebar you can use that to navigate your blog posts and even create news ones! Go ahead and open the one blog post you had made already, and you'll see all your content is there, and you can edit it as you wish.
Here's what this blog post looks like inside the Pages CMS interface as I write it.
Now, you have a collaborative and intuitive interface for creating blog posts without losing the control and security you get with static sites. It's the best of both worlds.
Deploying Your Site
When it's time to deploy your site, you can automate deployments by using Orbiter's Github Action. You can also manually deploy with a simple upload anytime. Since every change you make in Pages CMS is synced to Github when you save it, you can go to your Github repository and download the files in the repo, then you can upload them to Orbiter using our web app or our CLI.
You'll have your site online in just a few seconds. And if you do use the Github Action, you'll be able to continuously update and add to your blog posts without having to run any manual uploads.
Conclusion
Static sites are fast and simple, but collaborating on them or even managing a solo blog on them can be difficult. Headless CMS exist exactly for this situation. There are many Headless CMS options on the market, but Pages CMS is a ton of fun and very intuitive. We look forward to seeing your creations!
Signup for our Newsletter